19 July 2022
UITouch Me If You Can

During several interview processes, I’ve been asked many times about UIResponder and what the beast it is. I guess everybody can somehow explain this concept in iOS, which I did, but lack of in-depth knowledge frustrated me. So I decided to spend a few evenings to clarify it for myself. In this article I won’t cover the everything about UIResponder at once. Instead we’ll figure out how our app handles touches and how responder chain helps us in that process. Later on we can look at the target-action logic as well, so stay tuned to my RSS feed.
In short, UIResponder is an abstract interface for responding and handling events. All known UIView, UIViewController, UIWindow, UIApplication and UIApplicationDelegate are UIResponders.
For touch events the system uses hit-testing to determine where touch events occur. Specifically, UIKit compares the touch location to the bounds of view objects in the view hierarchy. The hitTest method of UIView traverses the view hierarchy, looking for the deepest subview that contains the specified touch, which becomes the first responder for the touch event. Then the system creates a UITouchEvent object, associates it with a view and dispatch the event to the system event queue by calling UIApplication.sendEvent.
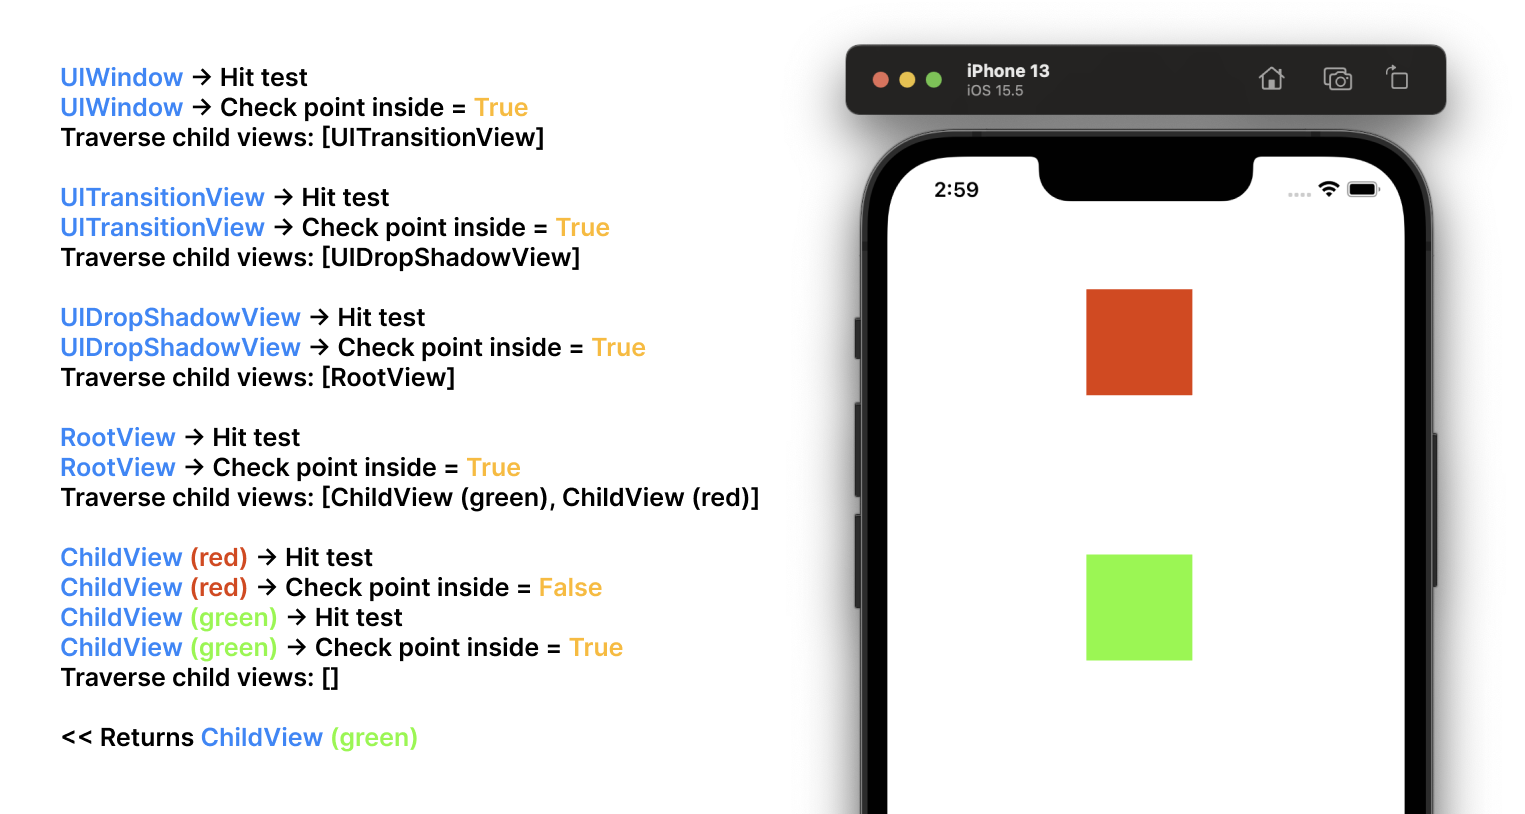
For a clear demonstration we’ll use a simple screen with two coloured views. By tapping on one of them we’ll explore the whole process of touching.
The investigation starts with tapping the screen, so let’s do that. As I mentioned earlier, the system uses hit-testing approach to determine who owns the touch. Thereby, by checking the stack trace of the starting point, we can see that system initiates a touch-test on the window layer, by enumerating each of them.
For every window we enumerate on we should find a deepest subview that contains (or not) the specified touch. Having the approximate implementation of hitTest following the documentation
func hitTest(_ point: CGPoint, with event: UIEvent?) -> UIView? {
    guard isUserInteractionEnabled, !isHidden, alpha >= 0.01, point(inside: point, with: event) else {
        return nil
    }

    // First, checks the subviews with the highest Z-coordinate value.
    for subview in subviews.reversed() {
        let convertedPoint = subview.convert(point, from: self)
        if let view = subview.hitTest(convertedPoint, with: event) {
            return view
        }
    }
    return self
}
we can see the iterating process over every subview to find the needed one:
Note. In some cases the hitTest maybe called twice - the system may tweak the point being hit tested between the calls. Since hitTest should be a pure function with no side-effects, this should be fine.
The first responder is found (green view), the next step is to detect a window to which the view is attached for. The system detects the view’s _responderWindow right before sending a touch event using UIApplication.sendEvent.
UIResponder chain comes here to the rescue. Starting with the green view, we’ll iterate through the responders up to the UIWindow using the next property.
ChildView -> RootView -> ViewController -> UIDropShadowView -> UITransitionView -> UIWindow
Having the window and first responder view, the system is ready to send an event:
SENT EVENT:

<UITouchesEvent: 0x600002108180>
timestamp: 37554.7
touches: {(
    <UITouch: 0x7fe8ebb0be20>
    phase: Began
    tap count: 1
    force: 0.000
    window: (UIWindow (0.0, 0.0, 390.0, 844.0))
    view: (ChildView (150.0, 300.0, 80.0, 80.0))
    location in window: {188.33332824707031, 361}
    previous location in window: {188.33332824707031, 361}
    location in view: {38.333328247070312, 61}
    previous location in view: {38.333328247070312, 61}
)}
later on the following method will be called in ChildView:
func touchesBegan(_ touches: Set<UITouch>, with event: UIEvent?)
Note. The hit-test view is linked with the UITouch object for all phases of the touch event (began, moved, ended and canceled). The system won’t start the hit-testing logic for further events again. It’ll take the associated view and send the events right in.
References
- Using Responders and the Responder Chain to Handle Events
- Hacking Hit Tests
- Increasing the tap area of a UIButton
© 2024 Nikita Ermolenko. Some rights reserved.


